'%3e%3cpath%20d='M14.584%204.27734L21.9274%208.55391V23.9564L14.584%2019.6798V4.27734Z'%20fill='%2368E053'/%3e%3cpath%20d='M7.34375%2024.2458L14.6871%2028.5224L21.9284%2023.9563L14.5849%2019.6797L7.34375%2024.2458Z'%20fill='%2359C239'/%3e%3cpath%20d='M0%204.58398L7.34342%208.86055V24.263L0%2019.9864V4.58398Z'%20fill='%232E4EF5'/%3e%3cpath%20d='M0%204.58325L7.34342%208.85981L14.5846%204.27657L7.2412%200L0%204.58325Z'%20fill='%23306FF5'/%3e%3cpath%20fill-rule='evenodd'%20clip-rule='evenodd'%20d='M32.134%202.5H34.073V3.95418H38.7817V2.5H40.6513V3.95418H44.1829V5.26987H40.6513V7.00103H38.7817V5.26987H34.073V7.00103H32.134V5.26987H28.5332V3.95418H32.134V2.5ZM37.3981%206.86328H35.5285V7.97123H30.6119V11.7798H28.6038V13.3724H35.5285V13.8572L28.5%2019.3969L31.0967%2019.5008L36.4287%2015.3114L42.0031%2019.3969H44.4266L37.3981%2013.8572V13.3724H44.4613V11.7798H42.4532V7.97123H37.3981V6.86328ZM32.5509%209.28693V11.7798H35.5285V9.28693H32.5509ZM37.3981%2011.7798V9.28693H40.5834V11.7798H37.3981ZM55.7496%202.5H57.6885V4.30041H61.9125V5.26987H57.6885V5.89309H61.6355V11.5092C61.6355%2011.6241%2061.5422%2011.7172%2061.4272%2011.7169L58.5195%2011.7097V10.7403H59.7659V10.3249H57.6885V12.3331H55.7496V10.3249H54.1569V11.6405H52.218V5.89309H55.7496V5.26987H51.6641V4.30041H55.7496V2.5ZM54.1569%206.86253V7.555H55.7496V6.86253H54.1569ZM57.6885%206.86253V7.555H59.7659V6.86253H57.6885ZM54.1569%208.52446V9.35538H55.7496V8.52446H54.1569ZM57.6885%208.52446V9.35538H59.7659V8.52446H57.6885ZM50.4867%202.70703H48.617V6.10012H46.9551V7.5543H48.617V19.1878H50.4867V7.5543H51.8716V6.10012H50.4867V2.70703ZM60.874%2012.2637H59.0043V12.6099H51.8027V14.1333H59.0043V18.0111H56.3038L56.65%2019.1884H60.874V14.1333H62.2589V12.6099H60.874V12.2637ZM56.9265%2014.8945H53.6719L54.0181%2016.3487H57.3419L56.9265%2014.8945ZM61.1485%202.70703H58.8633L59.2095%203.81498H61.4947L61.1485%202.70703ZM66.6719%203.2168H79.0052V4.62452H66.6719V3.2168ZM65.6543%208.70703H80.0257V10.1148H70.8852L68.6858%2016.3148V17.2186L76.5439%2017.1485L75.6054%2014.6615H77.6084L79.2052%2018.8789H77.9236H77.2022H66.8789V15.8805L68.9924%2010.1148H65.6543V8.70703Z'%20fill='%23020617'/%3e%3cpath%20fill-rule='evenodd'%20clip-rule='evenodd'%20d='M35.1498%2021.7207H29.8315L29.0001%2022.6114L29%2025.7296L29.8313%2026.6204L35.1498%2026.6205V25.8118H30.1331L29.8088%2025.4556V22.8855L30.133%2022.5294H35.1498V21.7207ZM44.2616%2021.721L38.4319%2021.7208V26.6206L44.2616%2026.6207L45.0928%2025.7299V22.6117L44.2616%2021.721ZM39.2407%2025.8119V22.5296H43.9598L44.2841%2022.8858V23.7095H40.0794V24.5182H44.2841V25.4557L43.9598%2025.8119H39.2407ZM35.1498%2023.7093H30.4205V24.5181H35.1498V23.7093ZM58.7072%2021.7246H53.294L53.1593%2021.8818C53.0539%2022.0048%2052.9711%2022.1017%2052.8887%2022.1981L52.8873%2022.1998L52.8859%2022.2014C52.8035%2022.2979%2052.7211%2022.3943%2052.6161%2022.5169L52.5078%2022.6433V25.693L52.6161%2025.8194C52.7216%2025.9425%2052.8046%2026.0396%2052.8873%2026.1365L52.8877%2026.1369C52.9704%2026.2338%2053.0534%2026.3309%2053.1593%2026.4545L53.294%2026.6117H58.7989V25.7117H53.7079L53.5713%2025.5517L53.4075%2025.3602V22.9761L53.5713%2022.7845L53.7079%2022.6246H58.7072V21.7246ZM67.2254%2022.8677H63.6288L63.0125%2023.4842V26.0093L63.3319%2026.3288L63.4017%2026.3985L63.6288%2026.6257H67.2254L67.659%2026.192L67.8417%2026.0093V23.4842L67.2254%2022.8677ZM63.9123%2023.857L64.0015%2023.7677H66.8528L66.942%2023.857V25.6365L66.8528%2025.7257H64.0015L63.9123%2025.6365V23.857ZM68.8604%2023.0002H69.7601V25.5378C69.8143%2025.6014%2069.8624%2025.6573%2069.9159%2025.7187H72.7353C72.7889%2025.6559%2072.8387%2025.5983%2072.8957%2025.5331V23.0002H73.7954V25.8735L73.6825%2026.0011C73.523%2026.1815%2073.4406%2026.2777%2073.2868%2026.4594L73.1521%2026.6187H69.5097L69.3754%2026.4669C69.2104%2026.2803%2069.1235%2026.1789%2068.9668%2025.9937L68.8604%2025.8678V23.0002ZM60.6988%2021.8289V26.5005H61.5985V21.8289H60.6988ZM78.6036%2024.5813V23.7679H75.6552L75.566%2023.8571V25.6366L75.6552%2025.7258H78.5041L78.6039%2025.6275V24.5813H78.6036ZM79.5036%2023.6566V21.7939H78.6036V22.8679H75.2826L74.6663%2023.4843V26.0094L75.2826%2026.6258H78.8058V26.4814L78.9109%2026.5883L79.5039%2026.0044V23.6566H79.5036Z'%20fill='%23020617'/%3e%3c/g%3e%3cdefs%3e%3cclipPath%20id='clip0_6697_31479'%3e%3crect%20width='82'%20height='28.5217'%20fill='white'/%3e%3c/clipPath%3e%3c/defs%3e%3c/svg%3e)
创建开发机
本文为您详细介绍通过控制台和命令行创建开发机的步骤和参数配置。
前提条件
通过控制台创建
💡 注意
旧版开发机目前无法开启docker功能,如需使用,请停止并删除旧版开发机,创建新的开发机使用。
旧版开发机目前无法开启docker功能,如需使用,请停止并删除旧版开发机,创建新的开发机使用。
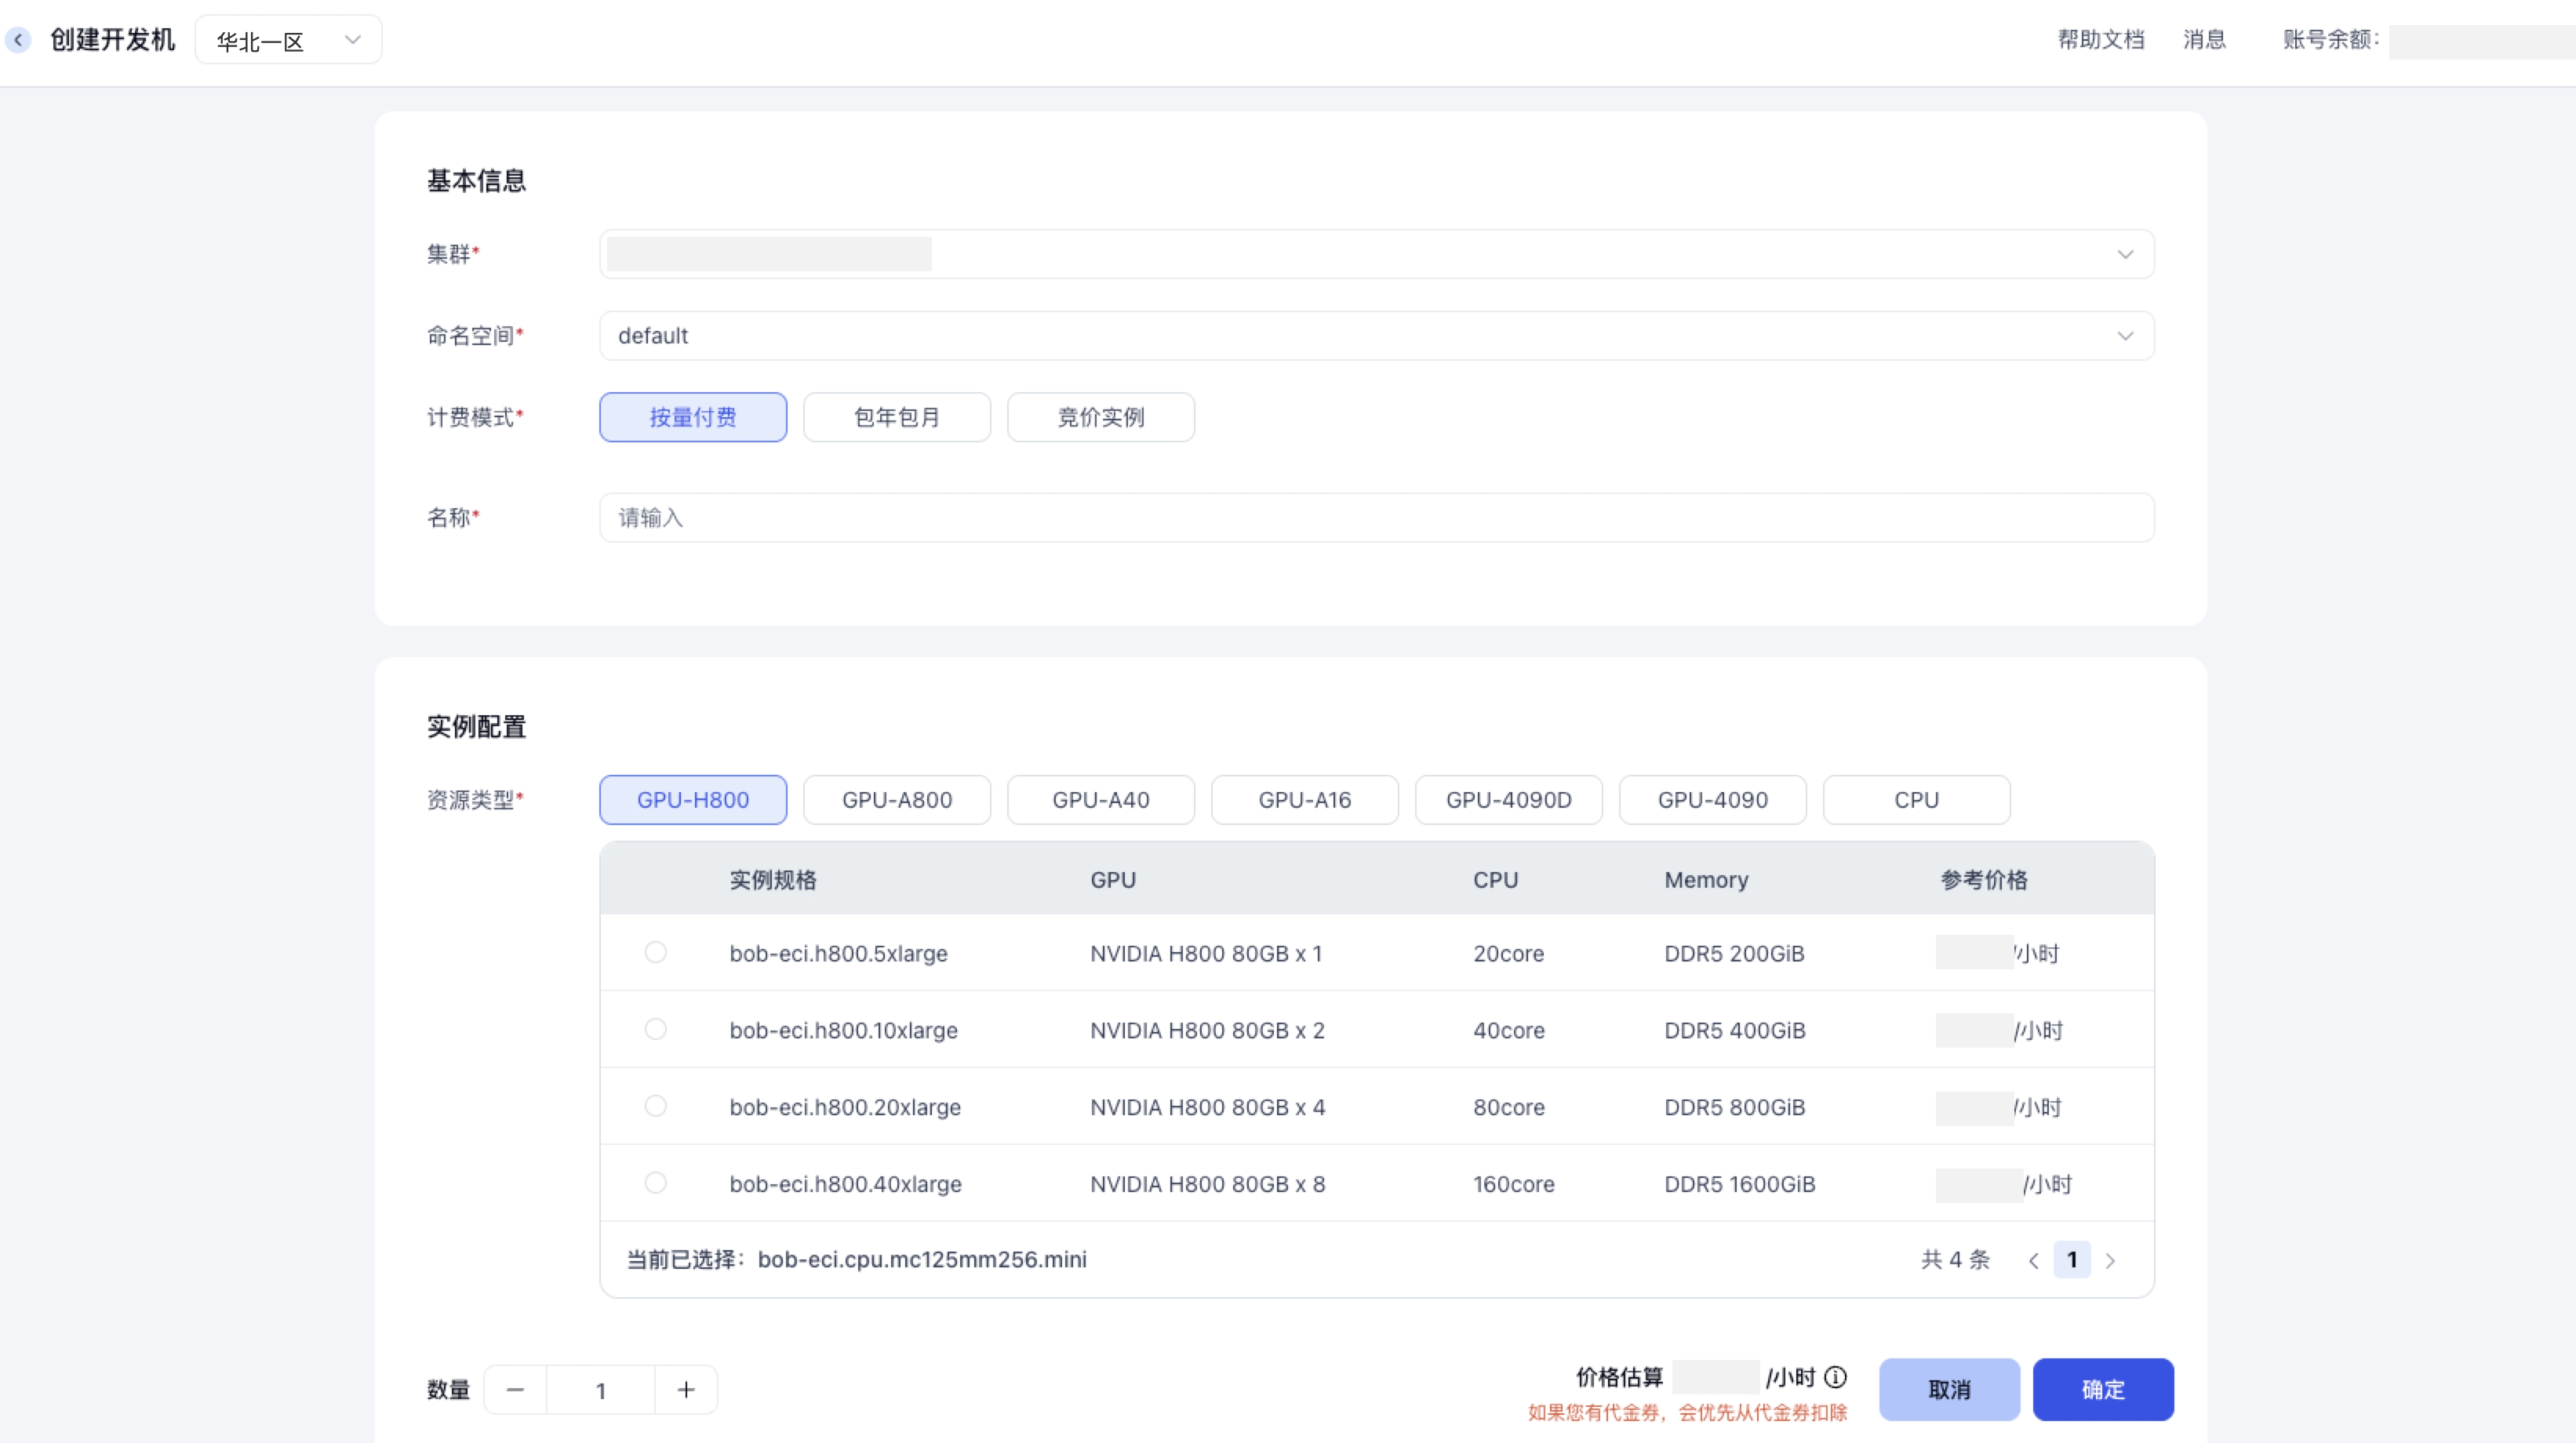
- 登录英博云控制台。
- 在页面左侧导航栏,选择 开发机,进入开发机列表页面。
- 在开发机列表页面,单击左上角 创建开发机,配置创建开发机所需的参数。
开发机配置
参数
说明
支持通过PVC挂载多块共享存储卷,按容量计费,支持SSD和HDD两种存储类型
支持通过PVC挂载多块块存储卷,按容量计费

通过kubectl命令行创建
前提:
- 已安装kubectl工具到本地。详情请参考:安装和设置 kubectl。
- 已通过 kubectl 连接目标集群。具体操作详情请参考:连接集群
开发机GPU、CPU类型标签:
GPU标签
型号
GPU显存
资源申请/限制
💡 注意
通过kubectl命令只能创建按量付费和竞价实例的开发机,暂不支持通过命令创建包年包月开发机。
通过kubectl命令只能创建按量付费和竞价实例的开发机,暂不支持通过命令创建包年包月开发机。
创建开发机的YAML文件,此示例中创建的按量付费单卡H800实例、启动docker容器,未启用公网IP,并挂载名为t256g的共享存储卷,示例文件 gpu-example.yaml代码如下:
########################################################
apiVersion: apps.ebcloud.com/v1alpha1
kind: ContainerServer
metadata:
  name: demo3
  namespace: default
spec:
  command:
  - sh
  - -c
  - |-
    if [ -z "${EBCS_SYS_INITIALIZED}" ] || [ "$(echo "${EBCS_SYS_INITIALIZED}" | tr '[:upper:]' '[:lower:]')" = "false" ]; then
        ## Init-Install命令,安装必要工具包
        ## 启用密码身份验证,允许用户通过密码登录
        mkdir -p /etc/ssh
        echo "PasswordAuthentication yes" >> /etc/ssh/sshd_config

        ## 允许root登录
        echo "PermitRootLogin yes" >> /etc/ssh/sshd_config

        ## 为scp文件启用sftp访问
        grep -q "^Subsystem sftp" /etc/ssh/sshd_config && sed -i 's|^Subsystem sftp.*|Subsystem sftp /usr/lib/openssh/sftp-server|' /etc/ssh/sshd_config || echo "Subsystem sftp /usr/lib/openssh/sftp-server" >> /etc/ssh/sshd_config

        ## 安装sshd及相关服务
        dpkg -i /public/shared-resources/openssh-server/ubuntu_22.04_amd64/*.deb

        ## 安装docker客户端
        cp /public/shared-resources/docker-build/docker /usr/bin/docker


        ## Init-Config命令,设置密码,配置相关环境
        ## init root password
        echo "root:$EBCS_SYS_ROOT_PASSWORD" | chpasswd
        echo 'Root password initialization complete.'

        ## init k8s环境变量
        if [ -f /proc/1/environ ]; then
          echo 'while IFS= read -r line; do export "$line"; done < <(tr "\\0" "\\n" < /proc/1/environ)' | tee -a /etc/profile
          echo "K8s env >> /etc/profile DONE"
        fi

        ## init docker配置文件
        if [ -n "$DOCKER_CONFJSON" ]; then
          mkdir -p ~/.docker
          echo "$DOCKER_CONFJSON" > ~/.docker/config.json
          chmod 600 ~/.docker/config.json
          echo 'Docker config initialization complete.'
        fi
    fi
    ## Launch命令,后台启动jupyter-lab,前台启动sshd作为container server的主进程
    ## 启动jupyterlab
    if command -v jupyter-lab >/dev/null 2>&1 && [ -n "$EBCS_JUPYTER_PORT" ] && [ -n "$EBCS_JUPYTER_TOKEN" ]; then
        cd /root && jupyter-lab --allow-root --ip=0.0.0.0 --port=$EBCS_JUPYTER_PORT  --NotebookApp.token=$EBCS_JUPYTER_TOKEN --no-browser --NotebookApp.allow_origin='*' --NotebookApp.allow_remote_access=True > /tmp/jupyter.log 2>&1 &
    fi
    if service ssh start -D; then
        echo "SSHD exited."
    else
        /usr/sbin/sshd -D
        echo "SSHD failed to start."
    fi
  enableDocker: true
  image: registry-cn-huabei1-internal.ebcloud.com/ebsys/pytorch:2.5.1-cuda12.2-python3.10-ubuntu22.04-v04
  initRootPassword: '*"92Z54sS3$yvA0R'
  network:
    public: false
    tcp:
      ports:
      - 22
      - 80
      - 443
  power: "ON"
  resources:
    cpu:
      count: "20"
    gpu:
      count: "1"
      type: H800_NVLINK_80GB
    memory:
      count: 200Gi
  sshAccess:
    enable: true
    targetPort: 22
  volumeMounts:
  - mountPath: /data
    name: t256g
    persistentVolumeClaim:
      claimName: t256g
# 执行以下命令,创建开发机。
kubectl apply -f gpu-example.yaml

# 执行以下命令,查看弹性容器实例是否创建成功。
kubectl get pod -n default

# 若需要删除开发机,执行以下命令。
kubectl delete -f gpu-example.yaml
配置示例一
- 创建 1核2Gi 按量付费CPU开发机启动docker容器、未启用公网IP、并挂载名为t256g的共享存储卷。
apiVersion: apps.ebcloud.com/v1alpha1
kind: ContainerServer
metadata:
  name: democpu
  namespace: default
spec:
  command:
  - sh
  - -c
  - |-
    if [ -z "${EBCS_SYS_INITIALIZED}" ] || [ "$(echo "${EBCS_SYS_INITIALIZED}" | tr '[:upper:]' '[:lower:]')" = "false" ]; then
        ## Init-Install命令,安装必要工具包
        ## 启用密码身份验证,允许用户通过密码登录
        mkdir -p /etc/ssh
        echo "PasswordAuthentication yes" >> /etc/ssh/sshd_config

        ## 允许root登录
        echo "PermitRootLogin yes" >> /etc/ssh/sshd_config

        ## 为scp文件启用sftp访问
        grep -q "^Subsystem sftp" /etc/ssh/sshd_config && sed -i 's|^Subsystem sftp.*|Subsystem sftp /usr/lib/openssh/sftp-server|' /etc/ssh/sshd_config || echo "Subsystem sftp /usr/lib/openssh/sftp-server" >> /etc/ssh/sshd_config

        ## 安装sshd及相关服务
        dpkg -i /public/shared-resources/openssh-server/ubuntu_22.04_amd64/*.deb

        ## 安装docker客户端
        cp /public/shared-resources/docker-build/docker /usr/bin/docker


        ## Init-Config命令,设置密码,配置相关环境
        ## init root password
        echo "root:$EBCS_SYS_ROOT_PASSWORD" | chpasswd
        echo 'Root password initialization complete.'

        ## init k8s环境变量
        if [ -f /proc/1/environ ]; then
          echo 'while IFS= read -r line; do export "$line"; done < <(tr "\\0" "\\n" < /proc/1/environ)' | tee -a /etc/profile
          echo "K8s env >> /etc/profile DONE"
        fi

        ## init docker配置文件
        if [ -n "$DOCKER_CONFJSON" ]; then
          mkdir -p ~/.docker
          echo "$DOCKER_CONFJSON" > ~/.docker/config.json
          chmod 600 ~/.docker/config.json
          echo 'Docker config initialization complete.'
        fi
    fi
    ## Launch命令,后台启动jupyter-lab,前台启动sshd作为container server的主进程
    ## 启动jupyterlab
    if command -v jupyter-lab >/dev/null 2>&1 && [ -n "$EBCS_JUPYTER_PORT" ] && [ -n "$EBCS_JUPYTER_TOKEN" ]; then
        cd /root && jupyter-lab --allow-root --ip=0.0.0.0 --port=$EBCS_JUPYTER_PORT  --NotebookApp.token=$EBCS_JUPYTER_TOKEN --no-browser --NotebookApp.allow_origin='*' --NotebookApp.allow_remote_access=True > /tmp/jupyter.log 2>&1 &
    fi
    if service ssh start -D; then
        echo "SSHD exited."
    else
        /usr/sbin/sshd -D
        echo "SSHD failed to start."
    fi
  enableDocker: true
  image: registry.cn-hangzhou.aliyuncs.com/tangshibo/docker-io-ubuntu:22.04
  initRootPassword: '*"92Z54sS3$yvA0R'
  network:
    public: false
    tcp:
      ports:
      - 22
      - 80
      - 443
  power: "ON"
  resources:
    cpu:
      count: "1"
    memory:
      count: 2Gi
  sshAccess:
    enable: true
    targetPort: 22
  volumeMounts:
  - mountPath: /data
    name: t256g
    persistentVolumeClaim:
      claimName: t256g